How to Sew Hook & Eye Closures
Hook and Eye Closures are commonly used in clothing and accessories to fasten two edges together. They can withstand a good amount of stress and are best known as the closures for bras but they are also used for tops, dresses, children’s clothes and even above zippers in skirts. You can use them on waistlines, neck openings and cuffs.
If you are new to sewing on hook & eye fasteners or have done it before and need a refresher, read on. We’ll explain how to place hook-and-eye fasteners correctly. You attach them with hand sewing. There are different ways to attach hook and eye closures. The following method is our preferred method. It is a sturdy way and has a very clean finish. It works the same for different sizes and models of hook & eye closures.
What Are Hook & Eye Closures
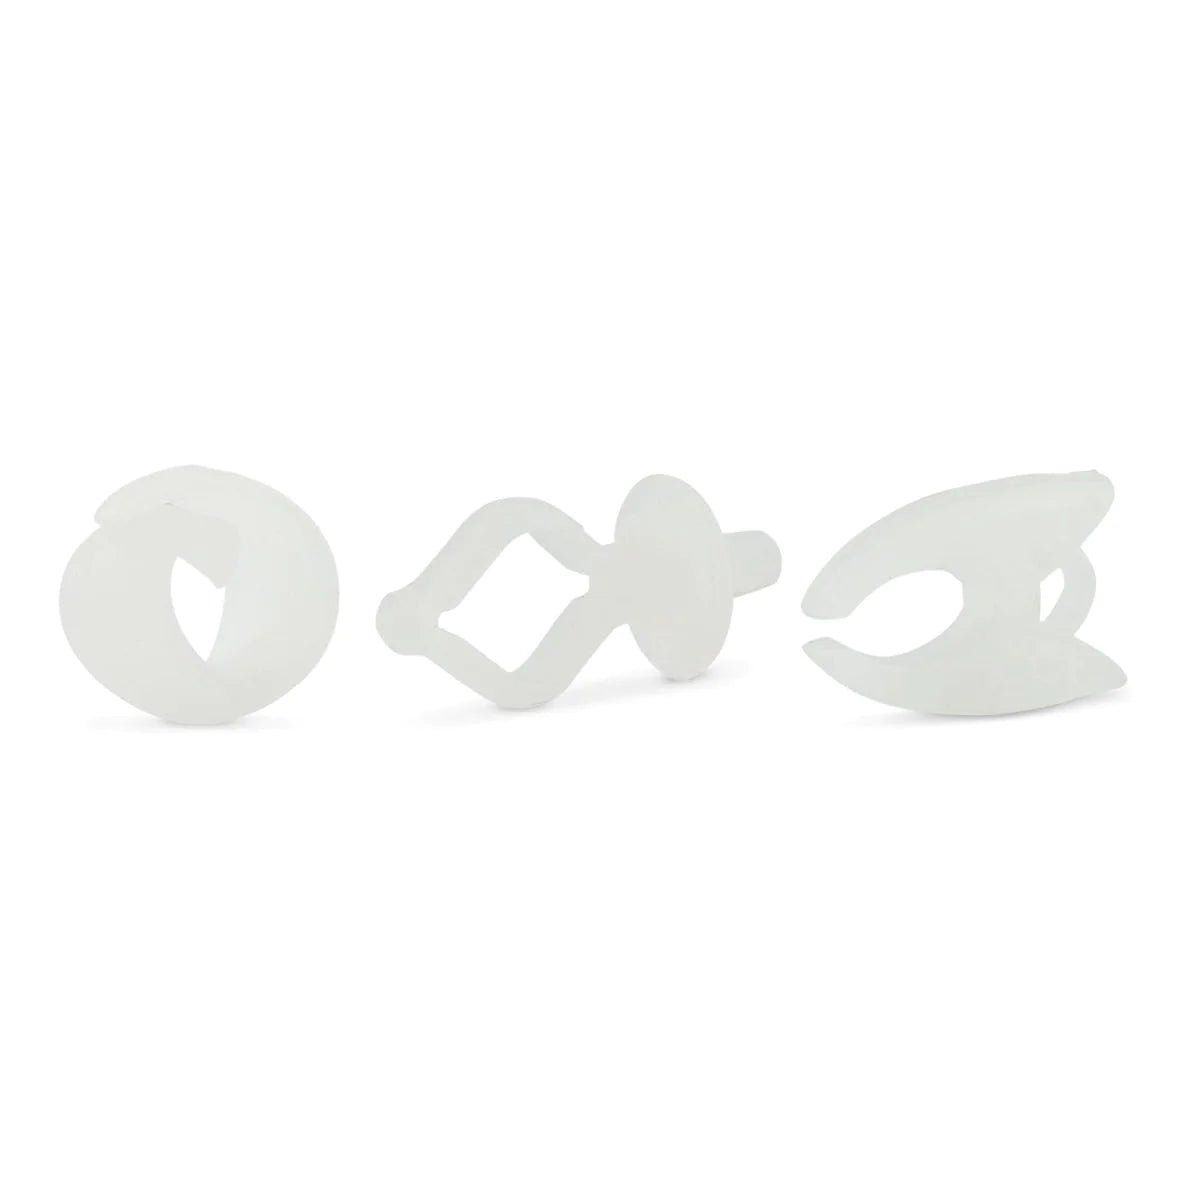
Most hook and eye closures look like the ones in the images below. These are from the Madam Sew Hook & Eye Closures set. A hook and eye closure always consists of two parts. One part has a small metal hook. The other part has a corresponding loop, also called the eye. The little hook fits in the eye.
If you are new to sewing on hook & eye fasteners or have done it before and need a refresher, read on. We’ll explain how to place hook-and-eye fasteners correctly. You attach them with hand sewing. There are different ways to attach hook and eye closures. The following method is our preferred method. It is a sturdy way and has a very clean finish. It works the same for different sizes and models of hook & eye closures.
When the hook is inserted into the eye, it creates a secure closure that doesn’t pop open under pressure like a snap would. The two circular holes one each part are used to sew the closures to the garment or accessory. The great thing about hook & eye fasteners is that they can be used for either overlapping or adjacent edges. On most projects hook and eye closures are completely hidden, sewn on the inside of a fabric edge or hem.
Prepare To Place a Hook and Eye Closure
- First, pick a size and color of hook & eye closure that will be the least noticeable on your garment but will still withstand the wear and tear.
- Then choose a thread that matches or is similar in color to the fabric you’ll be attaching the closure on. (In the images below we used a contrasting color to make sure the images show clearly how to do it.)
- Use as small a hand needle as you can and double thread the needle.
- Put a knot at the bottom of your threads and trim the thread tail close to the knot. For instructions on how to quickly tie a knot in your thread, view the mini blog: Hand Sewing Basics: Knot Your Thread.
- Iron the edges of the fabric that you are attaching the hook and eye closure to.
How to Position The Two Parts of the Hook & Eye Closure Correctly
You’ll start with the hook part. With the wrong side of your fabric facing up (i.e. the inside of your garment) put the hook on the left side of your garment. It should be positioned a little way from the edge, about ⅛” is good, so that once the garment is closed and there is natural pull on the hook & eye fasteners, they won’t be visible. To find the best position for the eye, you need to attach the hook first.
Attach the Hook Closure
1. Once you know where the hook will be placed, you can start to sew. Start through the back side of the garment (but not through the garment), right where the edge of the hook will go. Stitch two to three times in that spot to secure your thread with stitches that are only about as wide as that part of the hook so they can be hidden.
2. Position the edge of your hook on top of the stitches you just made. It is hard to keep it in place without moving so use a tiny piece of masking tape or even washi tape to secure it in place while you start to sew. Test the tape you are using to make sure it doesn’t damage your fabric.
3. Now, it is time to secure the front of the hook in place to make sure that when the garment is being worn, it doesn’t move out of position. Loop the thread over the hook you are now on the other side, Then take a stitch under the hook (the width of the hook), so you come up above it. Repeat this step two to three times to secure the hook in place.
4. Now, you can secure the other end of the hook, the one with the two holes. If you secured this part with tape earlier, remove the tape now. Once again, loop the thread over the hook so you are at the other end but instead of stitching up as we had been, bring the needle up through one of the little holes of the hook.
5. Next step is to stitch from the outside edge of the hole to the front with an end knot or button hole stitch. Keep the hook in position by holding the other hole in place.
Start your stitch on the outer wire edge of the hole, and stitch under it to come back up through the hole. Do not pull the thread completely taught, instead, stop the stitch when you have a small loop of thread left. Put your needle through this loop, front to back (make sure the loop isn’t twisted), and pull the thread until it is tight against the wire. This creates a small knot at that point.
Repeat this process three to four more times so that the stitches nestle next to each other instead of on top of each other. This will look nice and keep that area from becoming a bump of thread which could be uncomfortable for the wearer.
6. To sew the other hole, put your needle down through the hole you have been working with and have the needle come up through the other hole. Then repeat the process we just did.
7. Once the hook is sewed on you can finish off. To do so, sew a few knots next to your hook or lose your thread. For more information on how to lose your thread, view our mini blog on MadamSew.com: Hand Sewing Basics: Lose Your knot or Thread.
We are halfway there! We’ll be addressing the eye part of the hook and eye closure now.
Attach the Eye Closure
1. To find the best position for the eye, put it on the hook and hold the garment closed next to the hook (both wrong sides facing you). Line everything up so you know exactly where the eye will go and then place it back about 1/16” - ⅛” from the edge. When you are wearing a garment, there is a bit of pull on the closure. If you don’t move the eye a bit back from the edge, it will be visible and you may also have a bit of a gap there.
2. The eye, which is a small piece, moves even more than the hook when sewing, so you may wish to tape it down in place temporarily (make sure to test that the tape doesn’t ruin your fabric), while leaving the holes of the eye free to sew around. You can also mark 2 dots through the little holes to position it correctly and keep the position while attaching it. I used a heat erasable fabric marker. It has a fine enough tip and erases easily.
3. Use a double thread on your needle with a knotted end and trimmed tail. Start your sewing stitch on the outside of one of the eye holes and go under the wire and come up through the middle of the hole.
4. Then, do the same end knot stitch we did on the holes of the hook for both this eye hole and the other eye hole.
5. Like we did with the hook, we’ll want to secure the eye at the edge of the garment so that it doesn’t wiggle around. To do that, once you have stitched the holes of the eye, put your needle down into the last hole you were working on and come up next to one side of the front of the eye piece. Make one to two stitches across this wire and then do the same with the other side. When both sides are stitched down, finish off like you did with the hook.
This is how the hook and eye closure should look in the end, backside and front side. In this case the edges are not overlapping.
Maybe you are interested in getting this complete set with different sizes and colors of hook and eye closures as well as other closures, like swimwear closures and flat closures for pants and skirts.
We also have an online manual with instructions on how to sew the different hook and eye closures and attach the various fasteners and closures included in the box. Scroll through to the section that covers the type you wish to learn about. Interested in other types of closures? We also carry colorful plastic snap closures in the Madam Sew Store.
I hope this tutorial helps in finishing your projects in a more professional way and that you are having a lot of fun making beautiful things for yourself and your loved ones!
Happy Sewing!
An
Blogging for Madam Sew